Review: Easy Indian Cooking, Second Edition

Nibbles

indian-coverweb

***This is a sponsored post. I received a copy of Easy Indian Cooking, 2nd Edition, by Suneeta Vaswani, for the purpose of review. All opinions expressed are my own and no other compensation has been received. Now that we’ve got that out of the way…***

If you’ve been hanging around here for a while, you’ve probably figured out that Todd and I love Indian food in general, and that I love to try out authentic recipes when time allows (like participating in the Indian Cooking Challenge). So it’s no surprise that I jumped at the chance to check out Suneeta Vaswani’s updated Easy Indian Cooking.

The book opens with a brief information section that would have come in super-handy back when I first started trying those ICC recipes and I was having to Google every other ingredient to figure out what I was looking for or what I could substitute. If you’re just delving into Indian cuisine and are wanting to recreate some of the delicacies you’ve enjoyed in restaurants, this section will help you get started in ways that a single recipe might leave you wondering. Not that Vaswani doesn’t give you plenty of tips throughout the book, most recipes have a tip in the margins along with a little note describing the recipe, it’s history, or a memory associated with the food.

Of course we tried out some of the recipes, too!

Yellow Lentil Soup with Vegetables aka Toor Dal (page 72)

Yellow Lentil Soup with Vegetables aka Toor Dal (page 72)

This Yellow Lentil Soup was soup-er simple to prepare and so filling but without being very heavy. The flashes of color from the carrots, tomatoes, and green beans make this a very sunny soup and perfect for a rainy spring or summer day.

Coriander Chicken (page 92) with Potatoes in Tomato Gravy (page 167)

Coriander Chicken (page 92) with Potatoes in Tomato Gravy (page 167)

These Coriander Chicken thighs (page 92) were quite flavorful without being over-powering. While I used the Potatoes in Tomato Gravy (page 167) as a side dish, it actually cam from the Vegetarian Entrees chapter and is meant to be served with rice. Vaswani points out that Indians consider potato a vegetable (as opposed to a starch, the way most nutritionists would/do) and therefore thinking nothing of pairing it with a grain. As vegetarian entrees are quite popular among many of the Indian regions and rice is plentiful, this makes perfect sense. Still, I chose not to double up on the starches for this particular meal.

Sindhi Chicken Curry (page 102)

Sindhi Chicken Curry (page 102)

For many years I limited tomatoes in my diet due to a health condition that now seems to be under better control. I admit, we’ve been reveling in my new-found tolerance for this fruit/vegetable and the Sindhi Chicken Curry (page 102) was a wonderful way to reacquaint ourselves with a rich, well-spiced tomato sauce. This dish is a homey one that the author considers a “quintessential north Indian-style chicken curry.” I think it’s a perfect antidote to the idea that all curries are a) the same and b) all yellow with the ubiquitous curry powder as the main ingredient.

Curried Lamb aka Rogan Josh (page 126)

Curried Lamb aka Rogan Josh (page 126)

While it always sounds like a teacher taking attendance, Rogan Josh or Curried Lamb (page 126) is also one of the favorites when we head out to our local Indian restaurant. It’s not named for a person, though, as rogan can either mean oil or red color (like rouge or rojo) and josh mean heat or passion. So Rogan Josh is a dish cooked by high heat in oil, and in this case it’s lamb, as is perferred in the region of Kashmir, where it’s from. And it was just as good made at home as it was in any restaurant we’ve ordered it in!

Indian Scrambled Eggs aka Akoori (page 160)

Indian Scrambled Eggs aka Akoori (page 160)

Todd opted to try this Indian Scrambled Egg dish (page 160) on one of the frequent evenings we enjoy breakfast for dinner and I really wasn’t sure what to expect. It’s a Parsi dish that the author states is very popular in Mumbai (modern-day Bombay) and it makes a great stuffing for wraps or pitas. We enjoyed the cumin and tomato studded eggs more than we expected to! It’s nice to have this as an option, now, when the usual eggs over easy just aren’t sounding as appealing.

Indian Scrambled Eggs (aka Akoori)
from Easy Indian Cooking, 2nd Edition by Suneeta Vaswani

Serves 4-6

8 eggs
1 tsp salt or to taste
1/4 tsp freshly ground black pepper
3 Tbsp oil
1 tsp cumin seeds
1 cup chopped onion
2 tsp finely chopped green chili
1 cup chopped tomato
1/2 tsp cayenne pepper
1/4 tsp turmeric
1/4 cup cilantro, chopped
Tomato wedges and cilantro sprigs for garnish

  1. In a bowl, gently whisk eggs, salt and pepper. Do not beat.
  2. In a large skillet, heat oil over medium-high heat and add cumin seeds. Stir in onion and green chile and saute until golden, 3 to 4 minutes.
  3. Add tomato and saute, stirring continuously, for 1 minute. Stir in cayenne, turmeric and cilantro. Cook for 1 minute longer. Reduce heat to medium-low and slowly add egg mixture. Cook, stirring gently, until eggs are soft and creamy, 3 to 4 minutes. Do not overcook.
  4. Serve garnished with tomato wedges and cilantro sprigs.

Overall we enjoyed the recipes we tried from Easy Indian Cooking, 2nd Edition, and I especially loved the extra information included at the front of the book as well as with each recipe. This, I think, makes this book invaluable for a home cook looking to expand their culinary world with a minimum of fuss and a maximum of flavor.

Enjoy!

ICC: Khara Biscuit

Nibbles

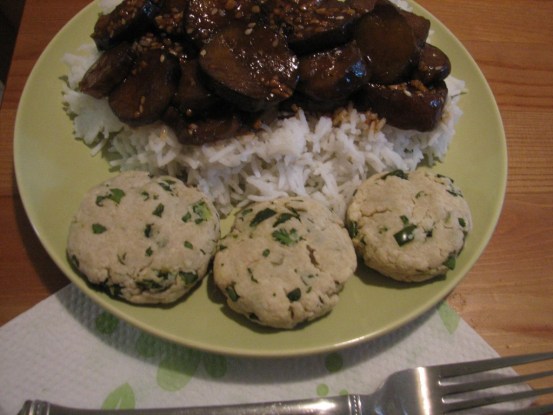
It’s June 15th and time for another foray into the Indian Cooking Challenge! This month we have a spicy, savory shortbread called a Khara Biscuit from the recipe files of Champa. Unlike the fluffy, leavened biscuits we’re familiar with, this unleavened biscuit is more of a cookie. Studded with chiles and cilantro they make a nice snack or accompaniment to a meal.

Khara Biscuits

Iyengar Bakery-style Khara Biscuit

Ingredients:
2 cups All-Purpose Flour
1 tsp Salt
6 Green Chiles, finely diced
3 Tbsp chopped Cilantro
6 Tbsp Butter, softened
4 tsp Sugar
3 Tbsp Plain Yogurt, plus more as needed (I used a total of 6 Tbsp, I think)

Putting it all together:

Preheat your oven to 325° Fahrenheit and line 2 baking sheets with parchment paper.

Mixing the dry ingredients In a bowl, whisk together flour and salt. Toss in the chopped chiles and cilantro until both are coated with a fine layer of flour and set aside.
The creamed butter and sugar, adding the yogurt In the bowl of an electric mixer, cream butter and sugar together until light and fluffy.

Add the yogurt and continue to beat until fully incorporated.

The fully-mixed dough With the mixer on low, add the dry ingredients and mix slowly, adding more yogurt as needed to get a dry but workable dough. Be careful not to overwork the dough as it could become tough.
Forming the biscuits without a cookie cutter The original recipe suggests rolling out to dough to 1/4″ thick and cutting them with round cookie cutters. I found the dough difficult to roll so opted to scoop even portions of the dough and flattened them with my hands.
The finished biscuits, top and golden-brown bottom Bake for 18-20 minutes, rotating the pans halfway through cooking. They’ll stay pretty pale but the bottoms will turn golden brown. Depending on the thickness of your biscuits, they may need a little more than 20 minutes (mine took about 25).

The original recipe mentioned using mint in place of the cilantro and I might have to make them again, just to try it out. The spicy cookies were a nice counterpoint to the sweet-garlic-eggplant we had that evening for dinner.

Khara Biscuits with Spicy Garlic Eggplant

ICC: Pudachi Wadi

Nibbles

It’s time for another installment of the Indian Cooking Challenge! And this month the authentic recipe I bumble my way through is the traditional Maharastrian Pudachi Wadi (aka Coriander Rolls). Now, for those who don’t know, in the United States coriander refers to the seeds (whole or ground) of the plant we call–in it’s leafy state–cilantro. Since we’re using the leaves, they’d be called Cilantro Rolls in our neck of the woods.

For many years I was not a huge fan of cilantro, and I’m not alone. The flavor was too pronounced, almost soapy in some instances and really was not my cup of tea. But the more worldly one eats, the more one is likely to encounter different flavors and, in time, I became more tolerant of the herb.

Good thing, too! Because these rolls are delicious and it would have been a shame to miss out on them if I’d never been willing to try cilantro again.

Pudachi Wadi
from Archana of Tried & Tested Recipes

Pudachi Wadi

Dough

1 cup Gram Flour
1 cup Wheat flour
3/4 tsp Chilli Powder
heaping 1/4 tsp Turmeric
Salt, to taste
4.5 Tbsp warm Oil
Water, as needed

Paste:

3 tsp Oil
1.5 tsp Garam Masala
3 tsp Tamarind Concentrate

Filling:
3 Tbsp Shredded Coconut
1.5 Tbsp Poppy Seeds
1.5 Tbsp Sesame Seeds 

1.5 Tnsp Oil
1 Onion, diced
1.5 tsp Ginger-Green Chilli Paste
3 cloves garlic, minced

2 bunches Cilantro, chopped fine (approx. 2 cups)
3/4 tsp Chilli Powder
Half a Lime, juiced
1.5 tsp Sugar
Salt, to taste

Oil, for frying

This one takes a little time, mostly because of the different steps, but it’s worth a few hours on a weekend afternoon to give it a try. A large part of the time required goes into rolling and forming the dough. While it wouldn’t be quite the same, I’m betting the paste and filling would be fabulous inside regular spring roll wrappers and steamed or fried.

I did have to finagle one ingredient: the ginger-green chilli paste. I substituted equal amounts of minced ginger paste and green salsa. Having never had the original, I can’t say how close I came but it seemed a logical substitution. If we’d had any in the house, I probably would have used Recaito, as it’s cilantro-based.

Combining the dough ingredients Make the dough. 

Mix the dry dough ingredients together and then stir in the warm oil. Depending on things like your flour’s water content and the humidity in your kitchen, the amount of water you’ll need to add to the mixture to make a smooth dough will vary. Just mix it in a teaspoon or two at a time until the dough is firm.

Set aside.

The paste ingredients Make the paste. 

Combine the oil, garam masala and tamarind concentrate into a smooth paste and set aside until it’s time to
assemble the pastries.

Toasting the coconut, poppy and sesame seeds Make the filling. 

Toast the coconut, poppy seeds and sesame seeds in a non-stick skillet until the coconut and sesame seeds are golden brown. Allow to cool.

Sauteing the onions, garlic and ginger green chilli paste Meanwhile, saute the onions in the oil until tender. 

Add the ginger-green chilli paste and garlic and saute briefly—just a few seconds–before removing from the heat to cool off a bit.

Grinding the toasted ingredients Process the now-cool coconut, poppy and sesame seeds until coarse. Really all you’re doing is breaking up the coconut as the others are already pretty small to start with.
Combining all the filling ingredients Transfer the onion mixture to a bowl and add the ground and toasted mixture, the chopped cilantro and the rest of the ingredients for the filling. Mix well and season to taste with additional salt as needed.
Rolling out the dough To Assemble the pastries

Divide the dough into 16 even pieces and roll each piece into a ball. Roll each ball into a circle (about 3 inches wide).

Brushing on the paste Brush a bit of the paste onto the center of the dough…
Adding the filling Then place a spoonful of the filling mixture in the center.
Wrapping the filling up Fold the edges of the dough over the filling and press them together to make a tight seal. It may help to add a little water to the edges of the dough.Apparently these rolls can either be round tubes–like a traditional spring roll–or triangles. I did some of each just to see if it made a difference. For what it’s worth, the triangular ones seemed to have a better distribution of dough and filling per bite.
Toasting the pastries Toast each roll or triangle lightly on a griddle. I almost skipped this step but am grateful I didn’t: the toasting firms us the dough so that they don’t fall apart so easily when you fry them. And electric griddle set on 250° worked perfectly for this as I could put one on, roll the next and flip the first when the second was added.
The final fry Deep fry the rolls just before serving. Frying goes quickly and, unlike a lot of fried foods, these do not float to the surface and bob around, they just sit there and cook so you need to turn them over after a few moments to keep them from getting too dark on any one side.

I think you’d also be safe making these up ahead of time through the toasting step and then refrigerating or even freezing them so you can fry as many as you need at any given time. Get a few people in the kitchen with you and bang out several batches at a go so you’re ready for anything. Because they don’t really hold all that great, we found, and reheating doesn’t do much for them once they’re fried.

~~~oOo~~~

I enjoyed participating in the monthly Indian Cooking Challenge so much that I created a monthly challenge of my own! For more details, check out the Medieval Cooking Challenge and sign up for the mailing list.

ICC: Punjabi Kadi Pakoras

Nibbles

It’s that time again–time for us to go tripping over ourselves in the pursuit of success in the Indian Cooking Challenge! And it’s finally something I recognize… sorta.

Punjabi Kadi Pakoras

Punjabi Kadi Pakoras

When we go out to our favorite Indian restaurant we generally order the sampler appetizer to split, so we’ve had pakoras before–several versions of them, too. Granted, they usually come without the Kadi (yogurt sauce) and, at leas the onion variety, resemble more of a hush puppy, but at least we knew what we were shooting for this time around.

My version of the recipe below is based upon the recipe provided by Simran of Bombay Foodie, though the main changes are adjustments required to the measurements. (US cups and British/Imperial cups are NOT the same thing–only took me  a few rounds to remember that little fact!)

Ingredients
Pakoras:

1 medium Onion, sliced lengthwise
5/8 c Besan/Gram Flour
2 t Salt

3/4 tsp Chili Powder
1/3-1/2 c Water
Oil for deep frying
Kadi:

1 1/2 c Plain Yogurt
1/3 (heaping) cups Besan/Gram Flour
3-4 cups Water
1 Tbsp olive oil
1 1/2 tsp Mustard Seeds
1 1/2 tsp Cumin Seeds
1 1/2 tsp Ajwain (Carom or Oregano) Seeds

1 1/2 tsp Methi (Fenugreek)
1 large Onion, diced
1 pinch Turmeric
3/4 tsp Chili Powder
Salt to taste
3/4 tsp Garam Masala powder
1 1/2 tsp Amchur (Dried Mango) powder
Slicing onions lengthwise The first step is to slice the onions lengthwise.

Now, I don’t know about your onions, by my onions are usually pretty round so slicing them lengthwise is a neat trick. Based on that whole concentric circles thing, I’m betting you could slice them diagonally and still be fine.

Luckily I did have one onion that was more oval than round. Though I still think lengthwise is anyone’s guess.

Batter Ingredients Start heating your frying oil while you mix up the batter. I set my electric fryer to 300 degrees Fahrenheit and that seems to work well for this sort of light item.

Combine the dry ingredients (besan, salt and chili powder) and mix together, well, before stirring in the water.

Go a little at a time with the water–you want something that’s thinner than paste but thicker than soup–something that will stick to the onion strips!

Battering up the Onion slices As always, depending on how wet your flour is (or how much humidity you’ve got) you may need more or less flour for your batter.

My batter was a little on the thin side, in hindsight–it’s just something you have to get a feel for, I suppose!

Toss your onion slices into the batter and give them several good turns until coated. If you’re still waiting for your oil to come to temperature, they can hang out in the bowl while you prepare the ingredients for the sauce.

Onion Pakoras Fry the battered onions until crispy, then drain on paper towels while you make the sauce.

Since I’m used to these being similar to fritters, I dropped the onion strips into the oil in small clumps. They cook fast, so they will stick together but they’ll also stick to the bundles you drop in nearby. No worries, though: you can always do some separating after they cool off a little bit.

If you stop right here and eat all the onions up, I wouldn’t blame you! I’m impressed that there were enough left for the sauce as Todd and I kept stealing tastes. This is now my official onion-ring recipe and, hey, it’s gluten free!

Kadi paste For the sauce (Kadi), combine the yogurt and besan into a paste, then whisk in water for a very thin batter.

Now, the recipe suggests that what makes this Punjabi is the thick sauce that the pakora are served in, and that a thin, watery sauce is actually a hallmark of Gujarti style dish.

With that in mind, 2 cups seems like more than enough to get a “very thin batter” but, take it from me, you want at least 3 cups of water in there.

Spices and a hot pan Heat the olive oil in a large frying pan (larger than I have here, hint!) and add the mustard, cumin, carom and methi seeds.

The instructions said to let “sputter” for a few seconds.

Folks, if you’ve got one of those splatter screens handy I’d use it at this point. Those little seeds (I’m looking at you, mustard) did NOT like being in the heated oil and took their revenge out on me like popcorn. But without the fluffy white puffs.

It was duck-and-cover mode for those few seconds.

Adding the onions to the spices Seriously, though, heating the spices does bring out the flavors, so it’s worth it–just be prepared.

Next, add in the diced onion (cooling down the pan a bit in the process) and cook until nice and golden brown.

Once golden add in the turmeric, salt and chili powder, give it a good stir before adding the besan and yogurt mixture.

This is when I realized that 2 cups of water wasn’t enough. Once in contact with the heat it immediately firmed up and I ended up whisking in another cup of water, slowly. This was also when I discovered the pan I’d chosen wasn’t really big enough.

The finishing spices--amchur and garam masala Messes were made. It’s not the end of the world.

Let this simmer for 30 minutes and don’t skimp on the time! The seeds need time to soften and impart their savory goodness. Don’t believe me? Taste the mixture after 5 minutes (but tread carefully so an not to bread a tooth on a fenugreek seed) and then after 30–exactly!

Finish the sauce by stirring in the amchur and garam masala powders.

Adding the pakoras Now stir in the reserved pakoras (or what’s left of them–seriously, those onions were amazing!) and cook just long enough to heat them through.

Serve with rice, naan or whatever else you like. It was Todd’s night to cook so we had this as an additional side dish with kebabs that night.

The next day we made sandwiches out of the leftovers in naan with a little drizzle of olive oil and some kosher salt on top. It makes for an amazing lunch.

The test.

So, we’d had pakoras before, but not the sauce. While shopping for ingredients we came upon a heat-and-eat packaged version of Punjabi Kadi Pakoras and thought it would be interesting to try them side by side to see how mine compared.

Purchased and Homemade Punjabi Kadi Pakoras

Purchased and Homemade Punjabi Kadi Pakoras

Right off we could see that the sauce in the packaged dish was deeper-colored and thinner. The purchased pakoras were small, tight dumplings and the fact that they contained spinach and quite a lot of heat were not the only differences. They had a peculiar texture that rang a distant bell. It took several small bites before I figured out what they reminded me of: the meatballs in canned Chef Boyardee Spaghetti. It was the mealy texture that just didn’t suit our palates, and I was very glad that no other pakora I’d ever had had tasted like that!

The only thing I would change about this recipe, if I were to make this Kadi again, would be to leave out the ajwain (oregano) seeds. As I opened each of the spice packets we’d picked up that afternoon I gave each a good sniff. What we discovered was the fenugreek was a major source of that comfort feeling we get from the curries that make us melt into our chairs. And that ajwain has a somewhat antiseptic smell that I did not like. It was less prevalent in the finished sauce but I could still detect it and I think the dish (for me) would be better served without it in the future.

Can’t wait to see what comes up to try next month!

Update: The rest of this month’s participants can be found at the Link-Up over on Spice Your Life.

ICC: Kara Sev

Nibbles

It’s the 15th of the month so that means it’s time to share another adventure courtesy of the Indian Cooking Challenge! This month we made Kara Sev, another snack food and another round with the fryer. Unlike last month’s Pani Puri which turned into a several-hour ordeal with mixed results, this month was easy as fry–

Kara Sev

Kara Sev

Kara Sev

Ingredients:

2.5 cups Gram Flour
1 cup Rice Flour
1 tsp Chili Powder
1 tsp Black Pepper
1 tsp Salt
1 pinch Baking Soda
5 Tbsp ghee
2 cloves garlic, minced
Water, as needed

My Notes:

*Gram flour is ground chick peas, you should be able to find it in your local organic foods section or you can make your own by drying out canned chick peas and processing in a blender or food processor until smooth

*I increased the chili powder x4 and could have actually gone up more, feel free to spice it up a little more

*I doubled the amount of ghee and could probably use more—you want a breadcrumb-type consistency and for that you need more fat to rub-in

If you’re not familiar with ghee, perhaps you’ve heard of clarified butter? They’re the same thing and if you’ve got unsalted butter, a saucepan and a ladle you’ve no need to hunt it down in a specialty food shop.

Clarifying Butter

Clarifying Butter

Over low heat, slowly melt the butter (for this recipe you’ll need about a stick) until it’s completely liquid. You’ll see a bit of white stuff come to the surface–those are the milk solids and you want to skim those off. The water has sunk to the bottom (in small quantities you have to be careful not to disturb that bottom layer, too) and the pure butter sits in the middle. Ladle off the clarified butter, leaving the water behind, and use as directed.

Now, onto the Sev!

Steps of the Kara Sev

Step-by-Step Kara Sev

1 ) Sift together the dry ingredients. I like to put half the flour(s) into the large sifter, add the seasonings, the finish off with the rest of the flour so that when I sift them together they get more evenly distributed.

2 ) Make a well in the center of the sifted dry ingredients and add the minced garlic and the ghee. Mix together the moist and dry (fingers really work best for this) until the mixture resembles bread crumbs. Clumpy ones, sure, but bread crumbs just the same.

3 ) Sprinkle water over the mixture until a dough starts to form. In truth, it was more like shallow handfuls at first, just to get things to hold together, then it tapered off to sprinkles until the dough was fairly solid and no longer sticky.

Let me tell you, at this point the dough smelled fantabulous–the bean flour and the chili powder were activated by the water and if the finished sev smelled this good we were going to be very happy.

4 ) Divide the dough into 4 balls. This is just to keep it manageable.

5 ) Heat canola oil to around 350 degrees Fahrenheit.

6 ) Push the dough through a sev ladle or maker into the hot oil.

Okay, here’s where we reach a bit of a cultural divide–what in the world is a sev maker? Turns out it’s a perforated ladle that you use as a die to create little strings of dough for frying. Not having one of those around I found some pictures of what a sev-maker looked like and they look an awful lot like my potato ricer (that’s it on the left). This is what I used for most of the kara sev (press out strings about 2 inches long then cut off with a knife into the oil–watch for splashing!).

Someone else suggested using  a cookie press and I thought that was an inspired idea. Unfortunately, in the handful of moves since I last used mine, only the tree-die remained with the press. Still, I gave it a shot.

7 ) Fry until just barely colored. The first batch I fried until it was a golden brown and it didn’t have a lot of flavor. Each batch afterwards I fried a little less and the flavor increased. Turns out it only takes a moment or two in the oil for them to cook through so get ’em in, let ’em bubble and get ’em out!

8 ) Drain the finished sticks on a piece of paper toweling.

The batch I tried through the cookie press (don’t forget to spray it with something to prevent sticking!) turned out fine, too, in wider strips, but I only did the one batch of those–the ricer worked best.

Todd really enjoyed snacking on these crunchy strings, I would prefer a little more flavor in the finished product so more salt and more chili powder would not go amiss.

Store the drained sev in an airtight container or plastic bag.

I’m still looking for the perfect dip that goes with these (maybe hummus?) since I’m not a huge fan of a lot of dry snacks but these are pretty addicting once you get started on them.